#getelementbyid innerhtml
Explore tagged Tumblr posts
Visit Tumblr Blog
Explore Tumblr blogs with no restrictions, modern design and the best experience.
Last Seen Tumblr Blogs


Fun Fact
Total funding amounts to $125.3M.
Text
JavaScript Fundamentals
I have recently completed a course that extensively covered the foundational principles of JavaScript, and I'm here to provide you with a concise overview. This post will enable you to grasp the fundamental concepts without the need to enroll in the course.
Prerequisites: Fundamental HTML Comprehension
Before delving into JavaScript, it is imperative to possess a basic understanding of HTML. Knowledge of CSS, while beneficial, is not mandatory, as it primarily pertains to the visual aspects of web pages.
Manipulating HTML Text with JavaScript
When it comes to modifying text using JavaScript, the innerHTML function is the go-to tool. Let's break down the process step by step:
Initiate the process by selecting the HTML element whose text you intend to modify. This selection can be accomplished by employing various DOM (Document Object Model) element selection methods offered by JavaScript ( I'll talk about them in a second )
Optionally, you can store the selected element in a variable (we'll get into variables shortly).
Employ the innerHTML function to substitute the existing text with your desired content.
Element Selection: IDs or Classes
You have the opportunity to enhance your element selection by assigning either an ID or a class:
Assigning an ID:
To uniquely identify an element, the .getElementById() function is your go-to choice. Here's an example in HTML and JavaScript:
HTML:
<button id="btnSearch">Search</button>
JavaScript:
document.getElementById("btnSearch").innerHTML = "Not working";
This code snippet will alter the text within the button from "Search" to "Not working."
Assigning a Class:
For broader selections of elements, you can assign a class and use the .querySelector() function. Keep in mind that this method can select multiple elements, in contrast to .getElementById(), which typically focuses on a single element and is more commonly used.
Variables
Let's keep it simple: What's a variable? Well, think of it as a container where you can put different things—these things could be numbers, words, characters, or even true/false values. These various types of stuff that you can store in a variable are called DATA TYPES.
Now, some programming languages are pretty strict about mentioning these data types. Take C and C++, for instance; they're what we call "Typed" languages, and they really care about knowing the data type.
But here's where JavaScript stands out: When you create a variable in JavaScript, you don't have to specify its data type or anything like that. JavaScript is pretty laid-back when it comes to data types.
So, how do you make a variable in JavaScript?
There are three main keywords you need to know: var, let, and const.
But if you're just starting out, here's what you need to know :
const: Use this when you want your variable to stay the same, not change. It's like a constant, as the name suggests.
var and let: These are the ones you use when you're planning to change the value stored in the variable as your program runs.
Note that var is rarely used nowadays
Check this out:
let Variable1 = 3; var Variable2 = "This is a string"; const Variable3 = true;
Notice how we can store all sorts of stuff without worrying about declaring their types in JavaScript. It's one of the reasons JavaScript is a popular choice for beginners.
Arrays
Arrays are a basically just a group of variables stored in one container ( A container is what ? a variable , So an array is also just a variable ) , now again since JavaScript is easy with datatypes it is not considered an error to store variables of different datatypeslet
for example :
myArray = [1 , 2, 4 , "Name"];
Objects in JavaScript
Objects play a significant role, especially in the world of OOP : object-oriented programming (which we'll talk about in another post). For now, let's focus on understanding what objects are and how they mirror real-world objects.
In our everyday world, objects possess characteristics or properties. Take a car, for instance; it boasts attributes like its color, speed rate, and make.
So, how do we represent a car in JavaScript? A regular variable won't quite cut it, and neither will an array. The answer lies in using an object.
const Car = { color: "red", speedRate: "200km", make: "Range Rover" };
In this example, we've encapsulated the car's properties within an object called Car. This structure is not only intuitive but also aligns with how real-world objects are conceptualized and represented in JavaScript.
Variable Scope
There are three variable scopes : global scope, local scope, and function scope. Let's break it down in plain terms.
Global Scope: Think of global scope as the wild west of variables. When you declare a variable here, it's like planting a flag that says, "I'm available everywhere in the code!" No need for any special enclosures or curly braces.
Local Scope: Picture local scope as a cozy room with its own rules. When you create a variable inside a pair of curly braces, like this:
//Not here { const Variable1 = true; //Variable1 can only be used here } //Neither here
Variable1 becomes a room-bound secret. You can't use it anywhere else in the code
Function Scope: When you declare a variable inside a function (don't worry, we'll cover functions soon), it's a member of an exclusive group. This means you can only name-drop it within that function. .
So, variable scope is all about where you place your variables and where they're allowed to be used.
Adding in user input
To capture user input in JavaScript, you can use various methods and techniques depending on the context, such as web forms, text fields, or command-line interfaces.We’ll only talk for now about HTML forms
HTML Forms:
You can create HTML forms using the <;form> element and capture user input using various input elements like text fields, radio buttons, checkboxes, and more.
JavaScript can then be used to access and process the user's input.
Functions in JavaScript
Think of a function as a helpful individual with a specific task. Whenever you need that task performed in your code, you simply call upon this capable "person" to get the job done.
Declaring a Function: Declaring a function is straightforward. You define it like this:
function functionName() { // The code that defines what the function does goes here }
Then, when you need the function to carry out its task, you call it by name:
functionName();
Using Functions in HTML: Functions are often used in HTML to handle events. But what exactly is an event? It's when a user interacts with something on a web page, like clicking a button, following a link, or interacting with an image.
Event Handling: JavaScript helps us determine what should happen when a user interacts with elements on a webpage. Here's how you might use it:
HTML:
<button onclick="FunctionName()" id="btnEvent">Click me</button>
JavaScript:
function FunctionName() { var toHandle = document.getElementById("btnEvent"); // Once I've identified my button, I can specify how to handle the click event here }
In this example, when the user clicks the "Click me" button, the JavaScript function FunctionName() is called, and you can specify how to handle that event within the function.
Arrow functions : is a type of functions that was introduced in ES6, you can read more about it in the link below
If Statements
These simple constructs come into play in your code, no matter how advanced your projects become.
If Statements Demystified: Let's break it down. "If" is precisely what it sounds like: if something holds true, then do something. You define a condition within parentheses, and if that condition evaluates to true, the code enclosed in curly braces executes.
If statements are your go-to tool for handling various scenarios, including error management, addressing specific cases, and more.
Writing an If Statement:
if (Variable === "help") { console.log("Send help"); // The console.log() function outputs information to the console }
In this example, if the condition inside the parentheses (in this case, checking if the Variable is equal to "help") is true, the code within the curly braces gets executed.
Else and Else If Statements
Else: When the "if" condition is not met, the "else" part kicks in. It serves as a safety net, ensuring your program doesn't break and allowing you to specify what should happen in such cases.
Else If: Now, what if you need to check for a particular condition within a series of possibilities? That's where "else if" steps in. It allows you to examine and handle specific cases that require unique treatment.
Styling Elements with JavaScript
This is the beginner-friendly approach to changing the style of elements in JavaScript. It involves selecting an element using its ID or class, then making use of the .style.property method to set the desired styling property.
Example:
Let's say you have an HTML button with the ID "myButton," and you want to change its background color to red using JavaScript. Here's how you can do it:
HTML: <button id="myButton">Click me</button>
JavaScript:
// Select the button element by its ID const buttonElement = document.getElementById("myButton"); // Change the background color property buttonElement.style.backgroundColor = "red";
In this example, we first select the button element by its ID using document.getElementById("myButton"). Then, we use .style.backgroundColor to set the background color property of the button to "red." This straightforward approach allows you to dynamically change the style of HTML elements using JavaScript.
#studyblr#code#codeblr#css#html#javascript#java development company#python#study#progblr#programming#studying#comp sci#web design#web developers#web development#website design#ui ux design#reactjs#webdev#website#tech
400 notes
·
View notes
Text
How to use JavaScript for data visualization
Data visualization is the process of transforming data into graphical or visual representations, such as charts, graphs, maps, etc. Data visualization can help us understand, analyze, and communicate data more effectively and efficiently.
JavaScript is a powerful and popular programming language that can be used for creating dynamic and interactive data visualizations in web browsers. JavaScript can manipulate the HTML and CSS elements of a web page, as well as fetch data from external sources, such as APIs, databases, or files.
To use JavaScript for data visualization, we need to learn how to:
Select and manipulate HTML elements: We can use JavaScript to select HTML elements by their id, class, tag name, attribute, or CSS selector. We can use methods such as getElementById(), getElementsByClassName(), getElementsByTagName(), querySelector(), or querySelectorAll() to return one or more elements. We can then use properties and methods such as innerHTML, style, setAttribute(), removeAttribute(), appendChild(), removeChild(), etc. to manipulate the selected elements.
Create and modify SVG elements: SVG (Scalable Vector Graphics) is a standard for creating vector graphics in XML format. SVG elements can be scaled without losing quality, and can be styled and animated with CSS and JavaScript. We can use JavaScript to create and modify SVG elements, such as , , , , , etc. We can use methods such as createElementNS(), setAttributeNS(), appendChild(), etc. to manipulate the SVG elements.
Handle events: We can use JavaScript to handle events that occur on the web page, such as mouse clicks, keyboard presses, window resizing, page loading, etc. We can use methods such as addEventListener() or removeEventListener() to attach or detach event handlers to elements. We can also use properties such as onclick, onkeyup, onload, etc. to assign event handlers to elements. An event handler is a function that runs when an event occurs. We can use the event object to access information about the event, such as its type, target, coordinates, key code, etc.
Use AJAX: We can use AJAX (Asynchronous JavaScript and XML) to send and receive data from a server without reloading the web page. We can use objects such as XMLHttpRequest or Fetch API to create and send requests to a server. We can also use methods such as open(), send(), then(), catch(), etc. to specify the request parameters, send the request, and handle the response. We can use properties such as readyState, status, responseText, responseJSON, etc. to access the state, status, and data of the response.
These are some of the basic skills we need to use JavaScript for data visualization. However, writing JavaScript code from scratch for data visualization can be challenging and time-consuming. That’s why many developers use JavaScript libraries and frameworks that provide pre-written code and templates for creating various types of data visualizations.
Some of the most popular JavaScript libraries and frameworks for data visualization are:
D3.js: D3.js (short for Data-Driven Documents) is a JavaScript library for producing dynamic and interactive data visualizations in web browsers. It makes use of SVG, HTML5, and CSS standards. D3.js allows us to bind data to DOM elements, apply data-driven transformations to them, and create custom visualizations with unparalleled flexibility1.
Chart.js: Chart.js is a JavaScript library for creating simple and responsive charts in web browsers. It uses HTML5 canvas element to render the charts. Chart.js supports various types of charts, such as line, bar, pie, doughnut, radar, polar area, bubble, scatter, etc.2
Highcharts: Highcharts is a JavaScript library for creating interactive and high-quality charts in web browsers. It supports SVG and canvas rendering modes. Highcharts supports various types of charts, such as line, spline, area, column, bar, pie, scatter, bubble, gauge, heatmap, treemap, etc. Highcharts also provides features such as zooming, panning, exporting, annotations, drilldowns, etc.
These are some of the popular JavaScript libraries and frameworks for data visualization. To use them in your web development project, you need to follow these steps:
Choose the right library or framework for your project: Depending on your project’s requirements, goals, and preferences, you need to select the most suitable library or framework that can help you create the data visualizations you want. You should consider factors such as the learning curve, documentation, community support, performance, compatibility, scalability, etc. of each library or framework before making a decision.
Add the library or framework to your web page: You can add a library or framework to your web page using either a script tag or an external file. The script tag can be placed either in the head or the body section of the HTML document. The external file can be linked to the HTML document using the src attribute of the script tag.
Learn how to use the library or framework features and functionalities: You need to read the documentation and guides of the library or framework you are using to understand how to use its features and functionalities effectively. You should also follow some tutorials and examples to get familiar with the syntax, conventions, patterns, and best practices of the library or framework.
Write your application code using the library or framework: You need to write your application code using the library or framework functions, methods, objects, components, etc. You should also test and debug your code regularly to ensure its functionality and quality.
These are some of the ways you can use JavaScript for data visualization. To learn more about JavaScript and data visualization, you can visit some of the online resources that offer tutorials, examples, exercises, and quizzes. Some of them are:
[W3Schools]: A website that provides free web development tutorials and references for HTML, CSS, JavaScript, and other web technologies.
[MDN Web Docs]: A website that provides documentation and guides for web developers, covering topics such as HTML, CSS, JavaScript, Web APIs, and more.
[Data Visualization with D3.js]: A website that provides a comprehensive course on data visualization with D3.js.
[e-Tutitions]: A website that provides online courses and for web , development, Learn JavaScript and you can book a free demo class.
[Codecademy]: A website that provides interactive online courses and projects for various programming languages and technologies.
0 notes
Video
youtube
Dev Online
#how to get value of textbox in javascript#document.getelementbyid get value getelementbyid innerhtml getelementbyid javascript javascript get element by name how to get value of text#document.getelementbyid get value#getelementbyid innerhtml#getelementbyid javascript#javascript get element by name#how to get value of textbox in javascript from html#javascript set textbox value#get id javascript
0 notes
Text
apprendre Javascript les bases
Pour commencer, voici une instruction simple en javascript pour récupérer le DOM d'un élément d'une page par son Id avec la méthode getElementById
var demo = document.getElementById("demo"); demo.innerHTML = "Hello World!";
Dans cet exemple, l'objet document est utilisé pour accéder au DOM. La méthode getElementById() est ensuite utilisée pour obtenir une référence à l'élément avec l'identifiant spécifié. Enfin, la propriété innerHTML de l'élément est défini sur une chaîne contenant le texte "Hello World!" (on remplace le contenu de l'élément par la chaine de caractère Hello World)
0 notes
Text
When the Mind Goes Blank (My Strategy on Tackling Code Challenges)
I have been a software engineering student at Flatiron School for a couple of weeks now. After reading the articles and listening to the lectures, I felt like I knew everything. However, each time I am assigned a project, my mind goes blank as soon as I finished reading the instruction. I had no idea what to do, I didn't know where and how to begin. Even though the projects(lecture activities, labs, mock code challenges) are well within the scope of lessons that I thought I have completely absorbed; I felt like I knew absolutely nothing at the most critical moments.
It took me a few failures at the code challenges before I realized why my mind goes blank in those moments. I knew the material and individual codes, but I didn't have plan on how to use them. It's like knowing how to stack a brick on top of another. Without a blueprint, stacking bricks alone cannot build a structurally sound building. I realized that I needed a blueprint to guide me, for the moments when my mind goes blank.
There are three parts to a code challenge when my mind can potentially go blank. First part is retrieving the data from a source. The source may be an API, a remote server or a local virtual server. Without the data from a separate source, nothing else can be done in a code challenge. Because the rest of the code challenge is all about manipulating and interacting with the data retrieved from a source.
The third part of a code challenge is usually adding event listeners to make certain elements in the DOM to be interactive and respond to actions. This may sound tough but as long as you can tackle the second part, which is the middle of the code challenge, then you should do just fine. (Did you think I forgot about the second part? No, I left it for the end on purpose)
The second part of a code challenge usually involves taking the data from the first part and manipulate them according to the instructions; aka DOM Manipulation. Most of the time my mind goes blank in this part, probably because there are so many techniques and codes that can be used for this part and my mind just feels lost about where and how to begin. This is where a blueprint is needed the most.
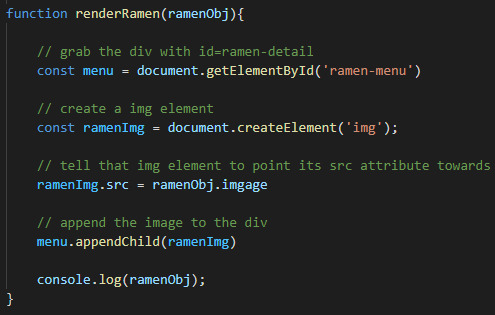
While coming up with a blueprint I came up with an acronym to help. I call it GAPA: Grab, Anchor, Point & Attach. The code challenge usually wants something done to the data retrieved from the first part. For example, place a picture at a certain spot, or print a sentence at a particular location. When my mind goes blank at this moment, I'll use GAPA to start manipulating the data.
1. Grab. First step in any DOM Manipulation is to locate where the instruction specifies. If the instruction wants me to place a picture under a certain tag, then I first need to GRAB it. I can grab it with document.getElementById() or document.querySelector(), and add an "id" or "class" to the tag if it doesn't already have one.
2. Anchor. Once we have grabbed a location, we need to create an anchor if it doesn't exist already. I usually do it with document.createElement(). Sometimes the HTML already has an anchor created so this step can be skipped.
3. Point. Now that we have a location and anchor point, what do we put in there? It could be a photo or a string, and we need to "point" to the source. For example, if the task is to attach a photo, then we can point the anchor we just created to a source like: anchorImg.src = data.image.
4. Attach. Now that we grabbed the location, created an anchor and pointed to the source, the last step is to attach them. Because at this point we have created a few things but never actually attached them to the DOM; they are still invisible to the naked eyes. As we have identified from the instruction, an image needs to be placed under a tag we grabbed in step one. We can accomplish this with .append, .appendChild or .replaceChildren depending on the situation. It would look like this: location.appendChild(anchorImg).
Conclusion. By following the GAPA method the second part of a code challenge should become clear to the mind, and helps to pave the road to third part as well. It's not a cheat or secret but it's a blueprint that helps with my thought process 100% of the time. To summarize: 1. Grab: usually with .getElementById()/.getElementByClassName or a Query Selector. 2. Anchor: usually with .createElement() or skipped completely. 3. Point: usually with .src for images or .textContent/innerHTML for strings. 4. Attach: usually with .append()/.appendChild() or .replaceChildren().
#education#learning#coding#computer science#software engineering#developer#javascript#flatiron school#code challenge
0 notes
Text
ESP32 Tutorial Arduino web server: 14. Sending data to JavaScript client via websocket
Introduction
In this tutorial we will check how to setup a HTTP web server on the ESP32, which will have a websocket endpoint and will serve a HTML page. The HTML page will run a simple JavaScript application that will connect to the server using websockets and periodically receive simulated temperature measurements from the server.
For simplicity, we will assume that only one client can be connected at most at each time, so we don’t need to deal with multiple connections.
We will also simplify the periodic sending of data to the client by taking advantage of the Arduino main loop and some delays. Nonetheless, a more robust and scalable implementation can be achieved using timer interrutps and semaphores to synchronize with a dedicated FreeRTOS task responsible for handling the sending of data.
In order to avoid dealing with big code strings and escaping characters, we will serve the HTML file from the ESP32 SPIFFS file system. For a tutorial on how to serve HTML from the file system, please check here.
We will be assuming the use of the Arduino IDE plugin that allows to upload data to the ESP32 SPIFFS file system. You can check in this tutorial how to use it. I’m assuming the HTML file that will be served is called ws.html, which means its full path on the ESP32 file system will be “/ws.html“. You can use other name if you want, as long as you set the correct path when developing the Arduino core, which we will analyze in detail below.
Also, to keep the HTML code simple, please take in consideration that we won’t be following all the best practices. Naturally, in a final application, you should take them in consideration.
The tests from this tutorial were performed using a DFRobot’s ESP32 module integrated in a ESP32 development board.
The HTML and JavaScript code
Our code will have two main sections: the head, where we will place the JavaScript code, and the body, which will have a HTML element to display the measurements.
In terms of JavaScript, we will start our code by instantiating an object of class WebSocket, which receives as input the complete websocket endpoint from our server.
If you don’t know the IP address of your ESP32 on your network, please run the Arduino code below and use the IP address that gets printed to the serial port when the device finishes connecting to the WiFi network.
If you want a more optimized approach and don’t want to depend on a hardcoded IP address, you can explore the template processingfeatures of the HTTP async web server libraries in order to set this value at run time, when serving the page. Alternatively, you can use the mDNS features for domain name resolution.
Additionally, as can be seen in the code below, we are assuming that the websocket endpoint will be “/ws”, as we will configure later in the Arduino code. From this point onward, we will deal with websocket events, which means configuring callback functions that will handle those events.
var ws = new WebSocket("ws://192.168.1.78/ws");
So, now that we have initialized the websocket, we need to setup a handling function for the connection established event. In this example, we will simply open an alert message so the user knows that the connection to the server was completed.
We setup the handling function by assigning a function to the onopen property of our WebSocket object, as shown below. Then, in the implementation of the handling function, we display our message to the user using the alert method of the window object, passing as input the message to display.
ws.onopen = function() { window.alert("Connected"); };
Finally, we will need to setup the handling function that will be executed when a message received event occurs. We set this handling function by assigning a function to the onmessage property of the WebSocket object.
Note that this handling function receives as input a parameter that we will use to access the data. We will call this parameter evt.
Inside the handling function, we will simply update the text of the HTML element that will show to the user the last temperature received. We are assuming there will be an element with an ID equal do “display“, as we will see in the final HTML code.
So, we use the getElementById method of the document object and update its inner HTML with the new measurement.
As mentioned, we will have access to a parameter we called evt, which is passed to our handling function. This will be an object of class MessageEvent, which has a property called data that contains the data sent by the server.
We will use the value received to concatenate with some strings and build the final text to display to the user.
ws.onmessage = function(evt) { document.getElementById("display").innerHTML = "temperature: " + evt.data + " C"; };
You can check below the full HTML code containing the JavaScript and the mentioned element with ID equal to “display”. It will be a simple paragraph since we are not focusing on design. That paragraph will start with a default “not connected” message, to be later substituted by the temperature message.
<!DOCTYPE html> <html> <head> <script type = "text/javascript"> var ws = new WebSocket("ws://192.168.1.78/ws"); ws.onopen = function() { window.alert("Connected"); }; ws.onmessage = function(evt) { document.getElementById("display").innerHTML = "temperature: " + evt.data + " C"; }; </script> </head> <body> <div> <p id = "display">Not connected</p> </div> </body> </html>
After finishing this code, we should upload it to the ESP32 file system using the Arduino IDE plugin, as already mentioned in the introductory section.
Arduino code
Includes and global variables
As usual, we will start the code by the needed library includes. We need the WiFi.h library to be able to connect the ESP32 to a WiFi network, the ESPAsyncWebServer.h to setup the HTTP server and the SPIFFS.h to be able to serve files from the file system (our HTML will be stored in the ESP32 SPIFFS file system).
We will also need the credentials of the WiFi network, more precisely the network name and password, so the ESP32 can connect to it.
In order to setup the server and the websocket endpoint, we will need an object of class AsyncWebServer and AsyncWebSocket, respectively.
As covered in the previous tutorials, the constructor of the AsyncWebServer class receives as input the port where the server will be listening and the constructor of the AsyncWebSocket class receives a string with the websocket endpoint. So, accordingly to the code below, our server will be listening on port 80 and we will have a websocket endpoint on “/ws“.
#include "WiFi.h" #include "SPIFFS.h" #include "ESPAsyncWebServer.h" const char* ssid = "yourNetwornName"; const char* password = "yourPassword"; AsyncWebServer server(80); AsyncWebSocket ws("/ws");
Additionally, since we are going to need to access the client object to periodically send it some data, we will declare a pointer to an object of class AsyncWebSocketClient.
As explained in more detail on this previous tutorial, the websocket events handling function will receive a pointer to an object of this class when an event occurs. In order to send data back to the client, we need to use that object pointer.
So, what we will do later on the websocket handling function is storing that pointer in this global variable, so we can send data to the client from outside the event handling function.
For now, when the program starts, we know that no client is connected, so we will initialize the global pointer explicitly as NULL. As long as it is NULL, we know that no client is connected and that we should not try to send data.
AsyncWebSocketClient * globalClient = NULL;
The setup
In the setup function we will take care of all the initialization that needs to be performed before the web server starts working properly. We start by opening a serial connection, initializing the SPIFFS file system and then connecting the ESP32 to a WiFi network.
Serial.begin(115200); if(!SPIFFS.begin()){ Serial.println("An Error has occurred while mounting SPIFFS"); return; } WiFi.begin(ssid, password); while (WiFi.status() != WL_CONNECTED) { delay(1000); Serial.println("Connecting to WiFi.."); } Serial.println(WiFi.localIP());
After that, we will bind the websocket endpoint to the corresponding handling function (we will analyze the function implementation below) and register the websocket object on the HTTP web server.
ws.onEvent(onWsEvent); server.addHandler(&ws);
Then, we will declare the route that will be serving the HTML with the websocket code. We will call the endpoint “/html” and listen only to incoming HTTP GET requests.
As explained in detail here, in order to serve the HTML back to the client as response to the request, we need to call the send method AsyncWebServerRequest object, passing as input the SPIFFS variable (which will be used under the hood to interact with the file system), the complete path to the HTML file on the ESP32 file system (as we have seen in the introductory section, the file was named “ws.html” and will be on the root folder) and the content-type (it will be “text/html” since we are going to serve a HTML page).
server.on("/html", HTTP_GET, [](AsyncWebServerRequest *request){ request->send(SPIFFS, "/ws.html", "text/html"); });
To finalize, we need to call the begin method on our server object, so it starts listening to HTTP requests. The final setup function is shown below and already includes this method call.
void setup(){ Serial.begin(115200); if(!SPIFFS.begin()){ Serial.println("An Error has occurred while mounting SPIFFS"); return; } WiFi.begin(ssid, password); while (WiFi.status() != WL_CONNECTED) { delay(1000); Serial.println("Connecting to WiFi.."); } Serial.println(WiFi.localIP()); ws.onEvent(onWsEvent); server.addHandler(&ws); server.on("/html", HTTP_GET, [](AsyncWebServerRequest *request){ request->send(SPIFFS, "/ws.html", "text/html"); }); server.begin(); }
The websocket events handling function
In this tutorial, we assume that the ESP32 is not going to receive any data but rather sending it periodically to the client. So, we will only listen to the client connection and disconnection events. For simplicity, we will assume that no more than one client will be connected at each time.
So, our handling function will be very simple. When a connection event is detected, we will receive as one of the inputs of the handling function the pointer to the client object (it will be an object of class AsyncWebSocketClient, as already mentioned).
So, we will assign that value to the global AsyncWebSocketClient pointer we have declared previously, so we can later send data to the client, outside the scope of this websocket event callback function.
In case we detect a disconnection event, then we should no longer try to send data to the client, so we will set the global pointer back to NULL.
The full handling function can be seen below. It includes some extra prints so we can get a message in the Arduino serial monitor when the events occur, making it easier to debug eventual problems.
void onWsEvent(AsyncWebSocket * server, AsyncWebSocketClient * client, AwsEventType type, void * arg, uint8_t *data, size_t len){ if(type == WS_EVT_CONNECT){ Serial.println("Websocket client connection received"); globalClient = client; } else if(type == WS_EVT_DISCONNECT){ Serial.println("Websocket client connection finished"); globalClient = NULL; } }
If you want to know more about the signature that this handling function needs to follow, please check this previous tutorial.
The Arduino main loop
We will make use of the Arduino main loop to send data periodically to the client, when a connection exists. Please note that this is not the most optimized approach since we are going to periodically poll the global pointer to check if a client is available. Also, we are going use the Arduino delay function to wait between the iterations of the loop.
For a more optimized alternative, we could have used timer interrupts, semaphores and a dedicated FreeRTOS task. Nonetheless, in order to focus on the websocket communication, we are following the simplest approach.
So, in our main loop, we will check if the global client pointer is different from NULL. Additionally, as a safeguard, we will also call the status method and check if the client is connected by comparing the returned value with the WS_CONNECTED enumerated value.
if(globalClient != NULL && globalClient->status() == WS_CONNECTED){ // Sending data to client }
If both conditions are met, it means the client is connected and we can send data to it. Since we are not using any real sensor and only simulating the interaction, we will returning a random number between 0 and 20 to the client, simulating a possible temperature reading. Please check here more about random number generation on the ESP32.
To send the data to the client, we need to convert it to a string and then call the text method on our AsyncWebSocketClient object. Since we have a pointer to the object, we need to use the -> operator.
String randomNumber = String(random(0,20)); globalClient->text(randomNumber);
After that, we will do a 4 seconds delay. You can try to use other values if you want to change the refreshing rate in the HTML page. You can check the full loop function below.
void loop(){ if(globalClient != NULL && globalClient->status() == WS_CONNECTED){ String randomNumber = String(random(0,20)); globalClient->text(randomNumber); } delay(4000); }
The full Arduino code
The final Arduino code can be seen below.
#include "WiFi.h" #include "SPIFFS.h" #include "ESPAsyncWebServer.h" const char* ssid = "yourNetworkName"; const char* password = "yourPassword"; AsyncWebServer server(80); AsyncWebSocket ws("/ws"); AsyncWebSocketClient * globalClient = NULL; void onWsEvent(AsyncWebSocket * server, AsyncWebSocketClient * client, AwsEventType type, void * arg, uint8_t *data, size_t len){ if(type == WS_EVT_CONNECT){ Serial.println("Websocket client connection received"); globalClient = client; } else if(type == WS_EVT_DISCONNECT){ Serial.println("Websocket client connection finished"); globalClient = NULL; } } void setup(){ Serial.begin(115200); if(!SPIFFS.begin()){ Serial.println("An Error has occurred while mounting SPIFFS"); return; } WiFi.begin(ssid, password); while (WiFi.status() != WL_CONNECTED) { delay(1000); Serial.println("Connecting to WiFi.."); } Serial.println(WiFi.localIP()); ws.onEvent(onWsEvent); server.addHandler(&ws); server.on("/html", HTTP_GET, [](AsyncWebServerRequest *request){ request->send(SPIFFS, "/ws.html", "text/html"); }); server.begin(); } void loop(){ if(globalClient != NULL && globalClient->status() == WS_CONNECTED){ String randomNumber = String(random(0,20)); globalClient->text(randomNumber); } delay(4000); }
Testing the code
Assuming that you have already uploaded the HTML file to the ESP32 file system, simply compile and upload the Arduino code to your device.
Once it finishes, open the Arduino IDE serial monitor and wait for the connection to the WiFi network. When it is done, copy the IP address that gets printed. Then, open a web browser of your choice and write the following on the address bar, changing #yourIP# for the IP you have just copied
http://#yourIP#/html
You should get to the HTML page we have been developing and after a while, it should show an alert indicating the connection to the server was established. After that, as shown in figure 1, it should periodically update the temperature with the random values returned by the server.

Figure 1 – HTML page with the temperature messages.
0 notes
Text
SOLVED:Temperature Converter Solution
Create a file called tempconv.html Have a text box that you enter your temperature into Instead of a textbox to write the answer, use a div and getElementById and innerHTML Have a button that converts from C to F Have another button that converts from F to C Use 2 separate functions make sure ALL your javascript code is up in the head Set up an event for the button (Links to an external site.) to…
View On WordPress
0 notes
Link
We can print hello world in JavaScript. There are three possible ways. 1. document. getElementById. innerHTML 2. window.alert() 3.console.log() See more details with check the link.
0 notes
Text
Weekly Reflection 7
Journal Entry for Week 7
For Lab 11 I used JavaScript to make my website interactive, which I really enjoyed since it sort of shows how JavaScript should actually be used. You can make a site interactive by using interal JavaScript or by using an external JavaScript sheet and linking it like I did. Before you start editing your site with JavaScript, you must first choose the element of the site you want to edit. You can do this with a variety of methods, including document,getElementById, which gets elements by id’s, and document.getElementsByTagName, which gets elements by tag name. If there are multiple elements with the same id, you can specify which one you want by using brackets to select the number of the id. For example, if you document.getElementsByTagName("p") ang you only want to edit the first paragraph on the page, you would write paragraph[0]. With JavaScript, you can edit CSS using .style, change HTML using .innerHTML, and much more. With these tools, I added a day and night mode to my site by editing the body with JavaScript, made an image change when you hover over it, and added an alert to a link. In order for the site to recognize when to run these JavaScripts, events had to be used. Basically, an event is a condition that needs to be met in order for something to happen. There are many event types, but I mostly only used 3. I used onclick, which runs JavaScript when an element is clicked, onmouseover, which runs a JavaScript when the mouse hovers over something, and onmouseout, which is triggered when the mouse leaves an element.
I really liked this lab since it took the logic of JavaScript that I was familiar with and applied it to a website. I saw how functions, loops, and conditionals could be used on something visual, allowing me to move another step towards programming for practical use rather than educational.
0 notes
Text
Full-Stack: Front-End | JavaScript
JavaScript, or JS, is the language used to handle the interactions built into a website. Note that JavaScript is not the same thing as Java. JS is used to change HTML or CSS values. Just as with CSS, JS can be placed in an external .js file, internally in the <head> tag, or in the <body>.
To include an external JS file you use the <script> tag. Here is an example: <script src="myScript.js"></script>. This can be done in the <head> or <body> and looks exactly the same. Note: HTML is read by a browser from top to bottom. Some larger or more complicated JS instructions can bog down a page from loading and thus a lot of developers place their JS just before the closing </body> tag. This also means that none of the JS code can run until it is fully loaded by the browser. The src (source) attribute is the only required piece for the <script> tag. It should be set equal to the directory or address of the JS file. Internal JS is exactly the same but it doesn’t require a source. After the <script> tag, just jump into the functions and statements.
I won’t go into programming 101 here, for that, check out W3 Schools. I’m going to explain the basics of what makes JavaScript different from other coding languages. All variables must be declared before or at first use. Declare a variable using ‘var’. These variable values can be integers, decimals (called floats), text (called strings), objects (we won’t cover these), or other variables. Strings must be in single or double quotes. Here is an example of setting a variable, x, to hold different values:
var x = “5 hungry hippos”;
x=7;
x = “7”;
Notice declaring the variable, x, was only required once. Each time you set the variable equal to a new value, it replaces it. Each statement must be ended with a semicolon. The first 7 is an integer and the 7 within quotes is a string. JavaScript does not care for whitespace. X=7 is the same as X = 7.
To change an element of an HTML document by accessing the document use “document.” From there, append how you wish to find the element (called a method). Then include what you wish to change about that element (called a property). Lastly, include what you want to change it to. Here is an example: document.getElementById(‘someID’).innerHTML = “This is HTML text”;. Please note that the lower case “L” in element looks the same as the uppercase “i” in id.
Always begin with document. The main options for finding the element to be changed are getElementById, getElementsByClassName, getElementsByName, and getElementsByTagName.
None of this is really that interesting if it changes a page upon load. If that were the point, you would just write it that way in the HTML and CSS. That’s where events come in. Events are actions used to trigger particular JS functions. Include these events directly into the HTML element as if it were an attribute:
<p onclick=”myFunction()”> some HTML text… </p>
This myFunction() value should match a function within the JS code. Once the <p> element is clicked, the JS code would be able to run.
There are many events, methods, properties, etc. useable within JavaScript. As the case with the Full-Stack series, this has been just a snippet of how JavaScript works and how to set it up. Next week we will pull the hood up to get a look at the back-end side of web development.
Thank You for Reading,
Speak to you next week,
John Norman
CEO, Neo Solutions
0 notes
Text
JavaScript'e Giriş
http://kodlar.net/javascripte-giris/
JavaScript'e Giriş
JavaScript ile yapılabilecek bazı şeyler’e bir göz atalım.
JavaScript HTML içeriğini değiştirebilir.
Bunlardan metotlardan birisi getElementById(); ‘dir. Aşağıdaki örnekte html üzerinde bir buton oluşturulur onclick içerisine getElementById(“demo”).innerHTML içerisine “Hello JavaScript” verilir. butona basıldığında ise bu çıktı alınır.
<!DOCTYPE html> <html> <body> <h2>What Can JavaScript Do?</h2> <p id="demo">JavaScript can change HTML content.</p> <button type="button" onclick='document.getElementById("demo").innerHTML = "Hello JavaScript!"'>Click Me!</button> </body> </html>
Aynı şekilde JavaScript ile bir html öğesinin stilinide değiştirebilirsiniz. Aşağıdaki örnekte yazının boyutu butona basıldıgında değişir.
<!DOCTYPE html> <html> <body> <h2>What Can JavaScript Do?</h2> <p id="demo">Yazının boyutunu değiştir.</p> <button type="button" onclick="document.getElementById('demo').style.fontSize='35px'">Tıkla!</button> </body> </html>
JavaScript ile bir HTML öğesini gizleyebilirsiniz de ! Aşağıdaki örnekte butona tıkladığınızda yazının kaybolduğunu göreceksiniz..
<!DOCTYPE html> <html> <body> <h2>What Can JavaScript Do?</h2> <p id="demo">JavaScript can hide HTML elements.</p> <button type="button" onclick="document.getElementById('demo').style.display='none'">Click Me!</button </body> </html> >
Tam tersine gizli öğeleri açığada çıkarabilirsiniz !
<!DOCTYPE html> <html> <body> <h2>What Can JavaScript Do?</h2> <p>JavaScript can show hidden HTML elements.</p> <p id="demo" style="display:none">Hello JavaScript!</p> <button type="button" onclick="document.getElementById('demo').style.display='block'">Click Me!</button> </body> </html>
JavaScript Html ve Css ile kullanıldığında hem mobil hem de tarayıcı üzerinde çok aktif şekilde işlemler yapılabiliyor. Daha çok sunucu taraflı kullanılan bu dil çok kolaylık sağlıyor. Bu bölümde JavaScripte kısa bir giriş yaptık ve neler yapılabildiğini ucundan gördük. Diğer bölümleri takip edip ve JavaScript ile neler yapabileceğinizi keşfedin! 🙂
0 notes
Text
INFORMACION EXTRA
FUNCIONES MATEMATICAS
Como realizar sumas de dos o mas números
1
2
var operador1, operador2, suma;
suma = operador1 + operador2;
Realizar resta (diferencia) de dos números
1
2
var operador1, operador2, resta;
resta = operador1 - operador2;
Multiplicación
1
2
var operador1, operador2, multiplicacion;
multiplicacion = operador1 * operador2;
División
1
2
var divisor, dividendo, division;
division = divisor / dividendo;
Potencia de un número
1
var potenica = Math.pow()
Raíz cuadrada
1
2
var raizCuadrara = Math.sqrt(9);
alert(raizCuadrara);
Redondear un valor
1
2
var redondea = Math.round(9.45);
alert("Valor redondeado 9.45= "+redondea);
Redondear un número al entero mas cercano
1
2
redondea = Math.ceil(9.01);
alert("Valor ceil 9.01= "+redondea);
Decrementar al entero inferior
1
2
redondea = Math.min(9.01);
alert("Valor min 9.01= "+redondea);
Decrementar al entero inferior
1
2
redondea = Math.floor(9.99);
alert("Valor floor 9.99= "+redondea);
// //decrementar al entero inferior
Obtener el valor máximo de una serie de valores
1
2
var valorMaximo = Math.max(20,15,10,3,28,64,74,13,76);
alert("El valor maximo es:"+valorMaximo);
// //Valor maximo de una serie de valores
Obtener el valor mínimo de una serie de valores
1
2
var valorMaximo = Math.min(20,15,10,3,28,64,74,13,76);
alert("El valor minimo es:"+valorMaximo);
// //Valor maximo de una serie de valores
Valor absoluto de un número
1
2
var absoluto = Math.abs(-10);
alert(absoluto);
// // valor absoluto
Calcular el seno de un número
1
2
var seno = Math.sin(30);
alert("El seno de 30 = "+seno);
// // Seno
Calcular el coseno de un número
1
2
var coseno = Math.cos(30);
alert("El coseno de 30 = "+coseno);
// // Coseno
Generar un número aleatorio
1
2
var aleatorio = Math.random();
alert(aleatorio);
// //Generar valor aleatorio
Generar un número aleatorio de 0 a X
1
2
var aleatorio = Math.floor(Math.random()*101);
alert(aleatorio);
// //Generar valor aleatorio entre 0 a 100
Generar un número aleatorio de 0 a X con decimales
//Generar valor aleatorio entre 0 a 10
1
2
var aleatorio = Math.floor(Math.random()*10) + Math.random();
alert(aleatorio);
Obtener el valor de PI
1
alert(Math.PI);
innerHTML
¿Alguna vez se preguntó cómo podría cambiar el contenido de un elemento HTML? Tal vez quiera reemplazar el texto de un párrafo para reflejar lo que un visitante acaba de seleccionar en un cuadro desplegable. Mediante la manipulación de un elemento innerHtml podrá cambiar su texto y HTML tanto como desee.
Cambiar el texto con innerhtml
Cada elemento HTML tiene una propiedad innerHTML que define tanto el código HTML como el texto que se produce entre la etiqueta de apertura y cierre de ese elemento. Al cambiar el innerHTML de un elemento después de alguna interacción del usuario, puede crear páginas mucho más interactivas.
Sin embargo, el uso de innerHTML requiere una cierta preparación si usted quiere poder utilizarlo fácilmente y confiablemente. En primer lugar, debe dar el elemento que desea cambiar un id. Con ese id en su lugar usted será capaz de utilizar la función getElementById, que funciona en todos los navegadores.
Después de configurarlo, ahora puede manipular el texto de un elemento. Para comenzar, intentemos cambiar el texto dentro de una etiqueta en negrita.
Código JavaScript:
<script type="text/javascript">
function changeText(){
document.getElementById('boldStuff').innerHTML = 'Fred Flinstone';}
</script>
<p>Welcome to the site <b id='boldStuff'>dude</b> </p>
<input type='button' onclick='changeText()' value='Change Text'/>
Ahora sabes cómo cambiar el texto en cualquier elemento HTML, pero ¿qué pasa con el cambio de texto en un elemento basado en la entrada del usuario? Bueno, si combinamos el conocimiento anterior con una entrada de texto ...
Actualizar texto basado en la entrada del usuario
Mediante la adición de una entrada de texto, podemos llevar a la actualización de nuestro texto en negrita con lo que el usuario escribe en la entrada de texto. Nota: Actualizamos la función un poco y establecimos el id en boldStuff2.
Código JavaScript:
<script type="text/javascript">
function changeText2(){
var userInput = document.getElementById('userInput').value;
document.getElementById('boldStuff2').innerHTML = userInput;
}
</script>
<p>Welcome to the site <b id='boldStuff2'>dude</b> </p>
<input type='text' id='userInput' value='Enter Text Here' />
<input type='button' onclick='changeText2()' value='Change Text'/>
Cambiando html con innerhtml
También puede insertar HTML en sus elementos de la misma manera. Digamos que no nos gustó el texto que se mostró en nuestro párrafo y queríamos actualizarlo con algún color. El código siguiente tomará el texto negro antiguo y lo hará blanco brillante. Lo único que estamos haciendo diferente aquí es la inserción del elemento html span para cambiar el color.
Código JavaScript:
<script type="text/javascript">
function changeText3(){
var oldHTML = document.getElementById('para').innerHTML;
var newHTML = "<span style='color:#ffffff'>" + oldHTML + "</span>";
document.getElementById('para').innerHTML = newHTML;
}
</script>
<p id='para'>Welcome to the site <b id='boldStuff3'>dude</b> </p>
<input type='button' onclick='changeText3()' value='Change Text'/>
Este fue un ejemplo bastante simple para cambiar el HTML de un elemento. Todo lo que hicimos fue tomar el texto antiguo que estaba en la etiqueta de párrafo y lo rodean en una etiqueta de span para cambiar el color. Sin embargo, hay muchas más cosas que puedes hacer cambiando el HTML de un elemento, así que no olvides esta útil herramienta!
HTML5
Lo que es nuevo en HTML 5?
La declaración DOCTYPE para HTML5 es muy simple:
<!DOCTYPE html>
El (charset) declaración de codificación de caracteres es también muy simple:
<meta charset="UTF-8">
Ejemplo HTML5:
<!DOCTYPE html>
<html>
<head>
<meta charset="UTF-8">
<title>Title of the document</title>
</head>
<body>
Content of the document......
</body>
</html>
La codificación de caracteres por defecto en HTML5 es UTF-8.
Los nuevos elementos de HTML5
Los nuevos elementos de HTML5 más interesantes son:
Los nuevos elementos semánticos como <header>, <pie de página>, <article> y <sección>.
Los nuevos atributos de los elementos de formulario , como el número, fecha, hora, calendario y alcance.
Nuevos elementos gráficos : <svg> y <canvas>.
Nuevos elementos multimedia : <audio> y <video>.
En el siguiente capítulo, HTML5 Soporte , aprenderá cómo "enseñar" navegadores antiguos de manejar (nuevos) elementos HTML "desconocidos".
(Application Programming Interfaces) nueva API HTML5
Los más interesantes de la nueva API de HTML5 son:
Geolocalización HTML
Drag and Drop HTML
HTML almacenamiento local
Caché aplicación HTML
Trabajadores Web HTML
HTML SSE
Consejo: HTML El almacenamiento local es un poderoso reemplazo para las cookies.
Elementos eliminados en el HTML5
Los siguientes elementos HTML4 se han eliminado en HTML5:
inner es una caracteristica de los div
todo lo que este dentro del div lo puedo capturar desde un contenedor
eso se hace con inner
para usar inner los contenedores deben tener id
HTML5
comienza diferente, este trae funciones adicionales
estructura
el doctype
y el meta charser="utf-8"
Publicado por Salma Osorio
0 notes
Photo

What Tutorials Don’t Tell You: How to Approach Projects
I often hear that people who follow tutorials find themselves unable to approach JavaScript projects on their own.
One reason this happens is that tutorials give you a neat set of steps rather than the actual process of figuring out those steps on your own. Another reason people struggle with projects is that they compare their intermediate steps with someone else's finished product and get discouraged.
The truth of approaching a project isn't as neat as the tutorials (mine included) make it seem. The reality is that rather than belting out lines of perfect code, projects are done in small pieces with plenty of trial and error and a healthy dose of searching through reference materials.
In this article, you'll learn how to approach JavaScript projects on your own.
Important note: As you go through this article, you'll see some code examples. If any of them seem new or unfamiliar, it's okay to skim over them for now. The purpose of this article is to have you understand the overall process of approaching a project rather than getting distracted by technical details.
First Get Comfortable With the Basics
At a minimum, you'll want to get familiar with some of the basics of JavaScript (and programming in general). This might include variables, functions, if statements, loops, arrays, objects, DOM manipulation methods, such as getElementById, querySelectorAll, and innerHTML. You can Google these or look them up on MDN when you're done with this article.
Once you're comfortable with these concepts, you'll move much faster because you can focus on creating your project instead of worrying about how to write an if statement.
A lot of people rush past this step, and everything takes longer as a result. It's like attempting to play Level 3 of a video game without getting comfortable with the controls back in Level 1. Lots of avoidable frustration.
Make a Plan
Instead of jumping in and trying to do your project in a series of linear steps, take some time to look at the big picture first. Make a general plan. What sorts of things need to happen? For example, if you're trying to make a countdown clock, you might need a way to measure time, a place to hold the data, somewhere to display the numbers, and maybe a way to control the clock.
At this stage, you don't want to get bogged down in technical details because you're still thinking through the general ideas of what you want. As long as you have an overall plan, you'll have guideposts that will prevent you from getting too badly lost. In software design. this technique is often referred to as a use-case analysis.
Write It Without Code
Now that you have your plan, you'll want to figure out the details. My favorite way to do this is to write specifically what you want each part of your project to do. The key is to write it not in code but in plain language. (This is called pseudocode.) That way, you can think clearly about what your project is doing without getting distracted by syntax details.
For a countdown clock, your notes might look something like this:
Get current time
Specify end time
Find difference between current time and end time to get remaining time
Repeatedly get the remaining time for each step of the countdown
Show remaining time on screen at each step of the countdown
You can break individual parts into smaller pieces like so:
Show remaining time on screen at each step of the countdown
Divide time into hours, minutes, seconds
Show hours in one container
Do the same for minutes and seconds
Once you have your logic written out, you'll have a much easier time writing code. This is because it's simpler to write the code for a concrete step such as "subtract current time from end time" than it is to write the code for a whole project like "build a countdown clock."
Also note that you won't need to have a perfect series of steps written out at the beginning. This is a fluid process where it's okay to add things, remove things, get things wrong, learn, and improve.
Continue reading %What Tutorials Don’t Tell You: How to Approach Projects%
by Yaphi Berhanu via SitePoint http://ift.tt/2m4uX9y
0 notes
Text
Вести.Ru: Fire TV was the reason for the evacuation … – Вести.Ru
‘);(L=w[u]=w[u]||(setTimeout(n=function(){var s=L. shift(),T=’getElementsByTagName’,g=s.g,k=d.createElement(‘script’),G=’getElementById’,o=setInterval(function(){d[G](g).innerHTML&&L[0]&&n(clearInterval(o))},50),S=w.SharedWorker;k.type=’text/javascript’;k.async=!0;k.charset=’windows-1251′;k.src=’//code.’+a+’.ru/data/’+s.i+’.js?async=1&div=’+g+’&t=’+(f()*1e6|0);if(S)k.onerror=function(){var m=0,n=0,A=’addEventListener’,P=’postMessage’,W=new S(URL.createObjectURL(new Blob(['self.'+A+'("connect",function(e){var p=e.ports[0];p.’+A+’(“message”,function(m){var d=m.data,x=new XMLHttpRequest();x.open(“GET”,d.u,1);d.t?x.withCredentials=!0:x.responseType=”blob”;x.onload=function(){p.’+P+’({t:d.t,u:d.u,s:x.status==200,r:x.response})};x.send()},!1);p.start()},!1)’]))).port;W[A](‘message’,function(M){var R=/]+)[ '"]?[^>]*>/gi,r,D=M. data||{},F=function(){d[G](g).innerHTML=s};if(D. s)if(D. t){o=setTimeout(F,7e3);while(r=R. exec(s=D. r))W[P]({u:r[1].trim(m++)})}else{s=s.replace(D. u,URL.createObjectURL(new Blob([D. r],{type:’image/jpeg’})));if(++n==m)F(),clearTimeout(o)}},!1);W. start();W[P]({t:1,u:k.src+’&raw=1&tag=daaa_722750′})};(d[T](‘head’)[0]||d[T](‘body’)[0]).appendChild(k)}),[])).push({i:i,g:g})})(1804342); } else { (function(e){var t=”DIV_DA_”+e+”_”+parseInt(Math.random()*1e3); document.write(“); if(“undefined”===typeof loaded_blocks_directadvert){loaded_blocks_directadvert=[]; function n(){var e=loaded_blocks_directadvert.shift(); var t=e.adp_id; var r=e.div; var i=document.createElement(“script”); i.type=”text/javascript”; i.async=true; i.charset=”windows-1251″; i.src=”//code.directadvert.ru/data/”+t+”.js?async=1&div=”+r+”&t=”+Math.random(); var s=document.getElementsByTagName(“head”)[0]||document.getElementsByTagName(“body”)[0]; s.appendChild(i); var o=setInterval(function(){if(document.getElementById(r).innerHTML&&loaded_blocks_directadvert.length){n(); clearInterval(o)}},50)} setTimeout(n)}loaded_blocks_directadvert.push({adp_id:e,div:t})})(1167968); }
via Blogger http://ift.tt/2iQARoS http://ift.tt/mVP99O
0 notes